Introduction
I chose R134a over other alternatives for a few reasons. First, is millions of vehicles have been produced since the mid-90s with R134a air conditioning systems - it's the EPA approved replacement for R12. I figure it'll be around a while. Who knows whether these other alternatives will last. Second, you can buy it at the local auto parts store - you don't need EPA certification to get it. I've read lots of information on R134a and naysayers report that it's 10-15% less efficient than R12 when used in systems designed for R12. After I converted my Buick, I performed the following comparison.
On an 80 degree day, I started each of my 3 vehicles and let them idle with the air conditioning on. Using a thermometer in the center vents, I recorded the lowest temperature each would get to.
First, the Buick having been converted from R12 to R134a: 38 degrees.
Second, my 1992 Typhoon with R12 having been dealer serviced last month: 46 degrees.
Last, my 1997 Explorer with a factory R134a system: 48 degrees. The R134a conversion seems to work better than both the R12 and R134a factory systems.
The R12 system on the Grand National was a 3.25 lb (52 oz) system. The general rule of thumb is that the system should take about 80-85% of the R12 number in R134a refrigerant. Thus, I expected the system to take at least 40 oz of R134a. This rule of thumb, though, is NO replacement for having the right tools - mainly manifold gauges - to properly charge the system.
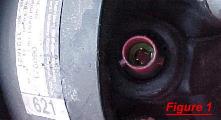
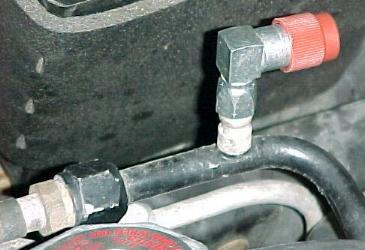
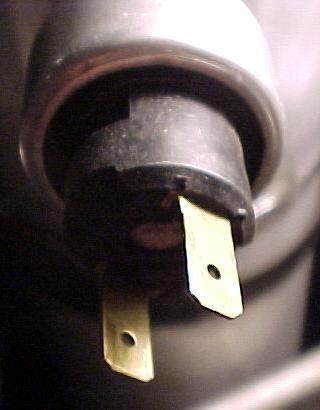
I'm going to assume you know how to replace your compressor. I didn't at the time, but you basically take things apart until you can get the compressor out. First thing that comes out is the alternator, then the intercooler needs loosened up and moved out of the way. Once out, you'll see there's a high-pressure cut-out switch on the back of it (you'd have to unplugged this to get the compressor out, but you would not have been able to see it easily - Figure 1).
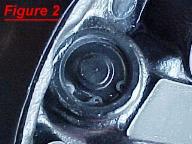
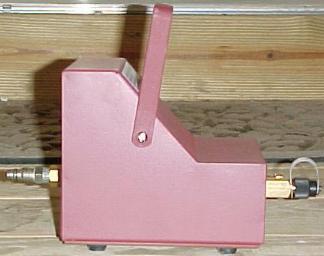
The new compressor I got from the auto parts store (a Four Seasons brand) did not have this switch on the back. It instead had a high pressure blow-out disc (Figure 2). This needs replaced with the old pressure switch from your compressor.
My old switch wouldn't come out, I destroyed it, and had to pay $20 for a new switch. If you do need to replace this switch, it's important to tell the auto parts store what color your original is (was) and how many prongs are on the electrical connector. This was the only real problem I had with the compressor.
It will also need filled with oil before you put it back in. Many different sources said to carefully empty the compressor and measure how much oil came out of it and then put that same amount back in. My system had already been evacuated, so I don't know how much oil was in it. The advice I got most on these systems was between 6-8 oz of oil total, with 2 oz being put in the compressor - I'll get to where the rest goes later. The oil, Ester oil, is specifically designed for R12-to-R134a conversions and comes in the conversion kits you buy at the auto parts store. I've read that the quality of the oil varies widely, and that the "kit" oils aren't great. Who knows. Below is the kit I got, which came with the necessary O-ring, oil, and R134a fittings.

It's a good idea to replace your O-ring if you have the system apart. It's cheap insurance against leaks. Contrary to popular belief, changing the O-ring is not required when converting to R134a if you have a good, non-leaking R12 system. There's no such thing as "r134a compatible" O-rings.
If your compressor bearings went bad like mine did, you probably have metal dispersed throughout the system. This means you also need to replace your accumulator/dryer(Figure 3).

Regardless, when switching from R12 to R134a you need to change the accumulator/dryer anyway because the desiccant used to absorb moisture in an R12 system isn't compatible with R134a. You should also put about 2 oz of oil in the accumulator/dryer before you install it. The remaining 2-4 oz of oil should be put into the lines. But before you do that, if you've had a compressor failure the lines should be flushed with a solvent to get rid of any contamination. I did NOT do this, but I did blow the condenser out with compressed air, which seemed to work fine.
If you have the system open, you'll also want to replace the orifice tube. It is the 'bridge' between the high and low sides of the system and also acts as a filter. I was able to remove mine with a pair of needle-nose pliers, but there are special tools for removing them (and repair kits in the event you break them off inside your evaporator line). It's located inside the inlet tube on the evaporator core. Below is a picture of its location:

I bought this set of gauges from JC Whitney for $99. All manifold gauges are basically the same as far as function goes, and they are R134a specific. If you plan to do any air conditioning work ever, these gauges are a must-have. Your air conditioning system has a "high pressure" and "low pressure" side. R134a systems are color coded with red representing high pressure and blue representing low. The low pressure gauge also has a vacuum reading. R134a fittings are standardized, quick-disconnect type fittings. The high-pressure fitting is bigger than the low so you cannot accidentally hook them up incorrectly. In addition to the red and blue hoses, there is a yellow hose for connecting refrigerant, oil, or vacuum to the system through the manifold gauges.
Below is a picture of the inside of a typical manifold gauge set. It will help you understand the functions of the knobs.
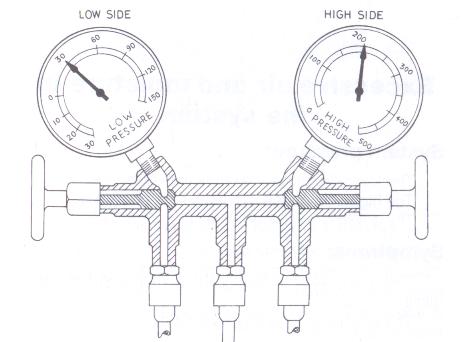
The hand valves on either side open the corresponding part of the a/c system to the yellow supply hose in the middle. So, if you open up the blue valve, the low pressure side is opened up to whatever is connected to the supply hose. NOTE that opening up the red knob opens the high pressure side to whatever is connected to the yellow supply hose. Thus, if you have the a/c compressor running and the high pressure side is at 180 psi (typical pressure) and you open the high side valve, you'll get 180 psi of pressure on the yellow hose AND whatever's attached to it. If what's attached happens to be a can of refrigerant, you can blow the can apart like a grenade. So, as general rule of thumb for do-it-yourselfers, never open the high side knob with the compressor running.
With both valves closed, the yellow hose is shut off from the air conditioning system BUT the gauges are still measuring pressure. This is why there's another set of valves on the hoses themselves (see below).
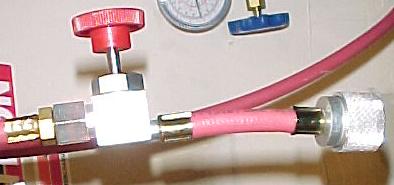
Make sure the connections to the gauges do not leak when performing tests. Regardless of whether you've had the system open or not, you'll want to do a vacuum check on it. In order to do this, you'll first need to install the high and low pressure R12 to R134a adapters that come with the conversion kits. The low pressure adapter (blue) goes on the accumulator/dryer, the high pressure (red) goes on the line going to the condenser:
You hook your manifold gauges up to these fittings using the quick disconnect hoses supplied with the gauge set. The yellow supply hose gets hooked up to a vacuum source. A lot of adapters require removing the valve stems from the old R12 fittings. Mine did, so I used a regular tire valve stem removal tool to remove the tems. I bought a venturi-type vacuum pump from JC Whitney for $65:
A source of compressed air hooks up on the left (minimum 4.2 CFM @ 90 PSI) and the yellow supply hose hooks up on the right. The alternative is expensive electric vacuum pumps - typically in the $3-400 range and up. Being able to apply a vacuum is a must. If you can't do it, take it somewhere that can do it for you.
Apply the vacuum to the supply line and open up both the high side and low side hand valves on the manifold gauge set. Note that the car is NOT running and thus the compressor is not running either. Run the vacuum for about 5-10 minutes to get it down to 25-29 in hg of vacuum and close the hand valves on the gauges - this seals the system from the supply hose. Shut off the vacuum. Watch the vacuum gauge for at least 10 minutes - it shouldn't move if the system is sealed. If you lose vacuum, you have a leak.
Once you're sure you don't have any leaks, go through the same procedure to apply vacuum to the system for an hour or so. This reduces the boiling point of the moisture in the system to below ambient temp (about 72 degrees) so that it will boil off. Removing moisture is a VERY important step. Again, if you don't have a vacuum pump take the car somewhere that does.
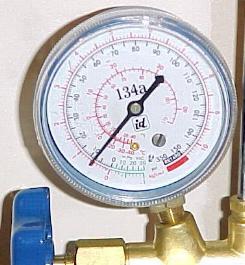
Once the moisture is out of the system, it's ready to be charged. I used 12 oz cans of refrigerant from the auto parts store:
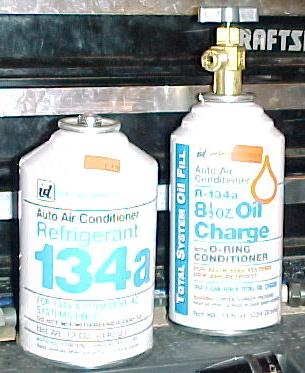
The can of oil is for systems that haven't been opened up nor had major components replaced. In a system that has been completely evacuated of R12, you would first lubricate the system with the can of oil before charging. However, since I had mine apart and added the oil to the major components, I didn't need to draw in more oil via this can.
To add refrigerant, hook the manifold gauges up to the appropriate sides of the system. Make sure the hand valves are closed. Tap a can of refrigerant and connect the yellow supply line to it.
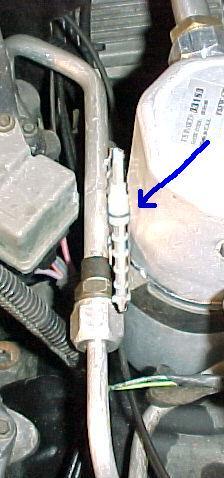
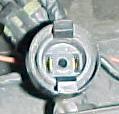
Open the tap on the can. Start the car and jump the pressure-cycling switch located on the accumulator/dryer. Just get a piece of wire and insert it into each side of the connector:
With the compressor running, open the LOW PRESSURE hand valve ONLY. The can should be upright, to draw vapor (not liquid) into the low side of the system. You'll see the gauge react to the pressure from the can of refrigerant and then level off. The compressor will be drawing in the refrigerant and the can will become very cold. Don't put your tongue to it no matter how strong the urge. Once about 2 cans of refrigerant are installed in this manner, you can probably hook the connector back up to the pressure switch. The compressor will likely run on its own.
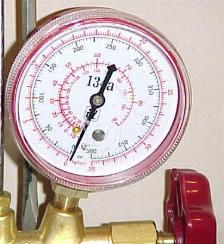
You'll begin to get steady pressures on the manifold gauges. The target pressures vary depending on ambient temps, but the range is 24-30 on the low side and 130-190 on the high side. The target pressures will be higher (definitely could be outside the aforementioned range) if it's hot out, lower if it's cool . To get the 38 degree outlet temps I got, I charged to 30 psi on the low side and 160 on the high side with 60 degree ambient temps. Keep adding refrigerant until the pressures come into range. Also keep an eye on the outlet temp via a probe-type thermometer. Use the "NORM" setting on the a/c, high fan and check the temp at the at the center air duct. If the temp stops dropping or starts increasing, you're fully charged. Remember, the rule of thumb is about 80-85% of the R12 capacity of 3.25 lbs (check the label on the evaporator core housing to be sure). Mine took 4 12 oz cans, but they all weren't completely empty when I discarded them.
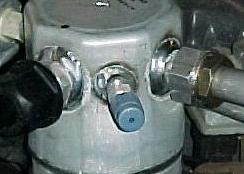
Once your pressures and temp are satisfactory, you'll have to adjust the compressor cycling switch to come on at a lower pressure than it did for R12. You want between 19-21 psi. Using your low pressure manifold gauge, watch at what PSI the compressor shuts off. You can reduce the cycling pressure by turning the screw beneath the connector on the cycling switch counter clockwise. Below is a picture of the switch - you can sort of see the screw:
Close the hand valves and unhook everything. You're done! And, unlike paying someone to do it you now have the tools and know-how to do it again.
Below is the cost of most parts and materials (I probably forgot some stuff, but this is most of it)
$150 Four Seasons rebuilt compressor
$ 20 High-pressure cut-out switch (not required if you don't destroy your old one)
$ 6 New orifice tube - orifice tube assembly gm #3033879, AC Delco #15-5151
$35 Accumulator gm #2724877, AC Delco # 15-1681 (should be painted black prior to installation)
$ 6 Thermometer
$ 30 O-ring and oil kit
$ 20 4 12-oz cans of refrigerant
$100 Manifold gauge set
$ 18 Can tap and hose (rip-off)
$ 65 Venturi-type vacuum pump
Total: $450 (you may spend more or less depending on local prices)